Monday, December 20, 2010

Installing and Configuring ISCSI Initiator on Ubuntu 10.10

To configure the iSCSI initiator on Ubuntu 10.10, do the following:

1. Install the initiator software if not already done: sudo apt-get install open-iscsi.

2. Edit the iscsi configuration file. It is located under /etc/iscsi
a. Set the startup to automatic by removing the comment from node.startup = automatic
b. Turn off the manual startup by placing a comment in front of node.startup = manual

3. Restart the initiator by executing sudo /etc/init.d/open-iscsi restart

4. Configure the iscsi target:
a. Execute iscsiadm -m discovery -t st -p <target_ip>. This will discover the target. It will create a configuration file under /etc/iscsi/nodes. THere will be a separte folder for each target and then for each interface.
b. If username and password are required by the target, edit the config files by executing the following series of commands:
iscsiadm -m node --targetname "iqn.2001-04.com.example:storage.lun1" --portal "<target_ip>:3260" --op=update --name node.session.auth.authmethod --value=CHAP
iscsiadm -m node --targetname "iqn.2001-04.com.example:storage.lun1" --portal "<target_ip>:3260" --op=update --name node.session.auth.username --value=someuser
iscsiadm -m node --targetname "iqn.2001-04.com.example:storage.lun1" --portal "<target_ip>:3260" --op=update --name node.session.auth.password --value=secret

5. Restart the initiator by executing sudo /etc/init.d/open-iscsi restart

You should now be connected to the target. Verify by executing fdisk -l. You should now see the disk. Using fdisk utilites partition as desired.
Tuesday, December 14, 2010

Installing and Configuring SQUIDGUARD on Ubuntu 10.10

Squidguard is a content filtering daemon that working in conjunction with Squid proxy on Linux. Many articles have been written that discusses installation and configuration. Most notably for Ubuntu see https://help.ubuntu.com/community/SquidGuard. This document briefly outlines what I did to get it working in my environment.

1. sudo apt-get install squid

2. sudo apt-get install squidguard

3. sudo apt-get update && sudo apt-get upgrade

This install squid and squidguard on the system. The following are the working directories and files

/etc/squid - squid and squidguard configuration folders

/usr/bin/squidGuard - application file

/var/log/squid - default squid and squidguard logging folder

/var/lib/squidguard/db - location of blocking database files

Now to go to the configuration...

1. Download a list of publicly available database blacklists. In my case I got them from urlblacklist.com.

2. As root, extract the contents into /var/lib/squidguard/db. The compressed file has a blacklist subfolder in it. Copy the items under this compressed subfolder into /var/lib/squidguard/db. The folder structure should now be /var/lib/squidguard/db/<category>.

3. As root, alter the ownership of all files in /var/lib/squidguard/db and under to the proxy account. Issue the command sudo chown -R proxy:proxy /var/lib/squidguard/db to accomplish this.

4. Change permissions on all of these files using the command sudo chmod -R 755 /var/lib/squidguard/db. While this is not the most secure thing, it's the only way I got it to work.

5. Modify the squid.conf file in /etc/squid to do the following:
a. Locate the url_rewrite_program line to read url_rewrite_program /usr/bin/squidGuard –c /etc/squid/squidGuard.conf
b. Uncomment #http_access allow localnet
c. Add visible_hostname localhost

6. Save the squid.conf file

7. Alter the squidGuard.conf file in /etc/squid to perform the following:
a. Remove all entries after logdir /var/log/squid
b. Add category definitions and acl lists in the following format:

dest <category_name> {
domainlist <category_name>/domains
urllist <category_name>/urls
}
acl {
default {
pass !<category_name>
redirect http://<url_of_blocking_page>
}

}

Note: THis file can have multiple dest categories. The category_names are those extracted in step 2. If blocking multiple categories, specify those as multiple category entries in the acl section. For noob's (!) means to block the list contents

8. Save the file and change the owner to proxy by issuing the command sudo chown proxy:proxy /etc/squid/squidGuard.conf

9. Issue the following commands to change permissions on these required files:

chmod 644 /etc/squid/squidGuard.conf
chmod -R 644 /var/log/squid/
chmod 755 /var/log/squid

10. Import all definitions configured in squidGuard.conf by issuing the command sudo squidGuard -C all.

11. Restart squidguard by issuing sudo squid -k reconfigure

12. Verify proper startup by reviewing the logs in /var/log/squid/squidGuard.log

Squidguard is now configured. Set the client to proxy all requests through <squid_server>:3128


Wednesday, November 10, 2010

Install Java on Ubuntu 10.10 64

After upgrading to Ubuntu 10.10, I noticed that the ice-tea firefox plugin for Java was installed. THis caused some issues with devices I was attempting to access. Here's how I resolved it:

  1. From the synaptec package manager, I removed icetea6-plugin.
  2. Add the repository: sudo add-apt-repository "deb http://archive.canonical.com/ maverick partner"
  3. Update the repository cache: sudo apt-get update
  4. Perform the install: sudo apt-get install sun-java6-bin sun-java6-jre sun-java6-plugin
  5. Restart Firefox
Now all is working.

Wednesday, August 11, 2010

Starting and Stopping DB Mail in 2008 R2

While I know for any SQL DB Admin this is rudimentary knowledge, I wanted to bring this to any ones attention on the way to start and stop DB mail in SQL Server 2008 R2. This is done via stored procedures in msdb.

To Start DB Mail:
exec dbo.sysmail_start_sp

To Stop DB Mail:
exec dbo.sysmail_stop_sp

To Verify DB Mail has started:
exec dbo.sysmail_help_status_sp

To Review The Mail Log:

SELECT * FROM msdb.dbo.sysmail_event_log


Thursday, July 29, 2010

Ubuntu Missing Windows Title Bars When Using Compiz

When compiz is loaded if the WIndow title bars are missing, perform the following
  1. Open up a terminal and type sudo su (enter your password)
  2. Type gedit /etc/X11/xorg.conf
  3. From the xorg.conf file, find the section called Section "Device" and just before EndSection, add the following and save the file:
  4. Option "AddARGBVisuals" "True"
    Option "AddARGBGLXVisuals" "True"

  5. Here is an example of an edited Section (your Section may vary):
  6. Section "Device"
    Identifier "Configured Video Device"
    Driver "fglrx"
    Option "AddARGBVisuals" "True"
    Option "AddARGBGLXVisuals" "True"
    EndSection

  7. Restart Ubuntu and the titlebar with related window decorations should reappear

Monday, June 28, 2010

Reset Default Panel in Ubuntu

The other day I messed up my default panel. I found a simple way to reset this to the default.

  1. Delete the folder in your home directory that hold the panel. From a terminal prompt, issue: rm -r ~/.gconf/apps/panel.
  2. Log out and then back in
Surprise... The panel is back to the default.

Wednesday, June 2, 2010

Install Java on Ubuntu 10.04

After upgrading to Ubuntu 10.04, I noticed that Java was no longer accessible. Furthermore the manual installation methods do not seem to work, nor will the default repository install. Here's what I had to do to get it working with the Firefox plugin:
  1. Add the repository: sudo add-apt-repository "deb http://archive.canonical.com/ lucid partner"
  2. Update the repository cache: sudo aptitude update
  3. Perform the install: sudo apt-get install sun-java6-bin sun-java6-jre sun-java6-plugin
  4. Restart Firefox
Now all is working.

Tuesday, April 27, 2010

Disable SSL2 Ciphers on IIS 7 in Windows 2008

IIS 7, for some reason, has SSL V 2.0 Ciphers enabled by default. These must be turned off if PCI compliancy is desired. Follow these steps to turn off this cipher

  1. Click Start, click Run, type regedit, and then click OK.
  2. In Registry Editor, locate the following registry key/folder:

    HKey_Local_Machine\System\CurrentControlSet\Control\SecurityProviders\SCHANNEL\Protocols\SSL 2.0

  3. Right-click on the SSL 2.0 folder and select New and then click Key. Name the new folder Server.
  4. Inside the Server folder, click the Edit menu, select New, and click DWORD (32-bit) Value.
  5. Enter Enabled as the name and hit Enter.
  6. Ensure that it shows 0×00000000 (0) under the Data column (it should by default). If it doesn’t, right-click and select Modify and enter 0 as the Value data.
  7. Restart the computer.

Wednesday, April 14, 2010

Ubuntu 9.1 64bit: Youtube display's video, but won't actually play

Ran into an issue the other day with Ubuntu 9.1 64bit. On Youtube, the video's you display the image, but when clicking on the video, it would not play. Here's how I fixed this...
1. Uninstalled the flash player via Synaptec
2. Ran:
sudo apt-get clean && sudo apt-get autoremove
3. Next ran wget http://download.macromedia.com/pub/labs/flashplayer10/libflashplayer-10.0.42.34.linux-x86_64.so.tar.gz. THis downloaded the latest flash player to my current directory (in my case ~/Downloads)
4. extracted the contents to this folder.
5. Next I ran: sudo cp ./libflashplayer.so /usr/lib64/mozilla/plugins
6. Restarted Firefox and went to Youtube. When it asked to install missing plugins, I told it to ignore. Video's played promptly...

Tuesday, April 6, 2010

Saturday, March 27, 2010

Citrix Slow Linux Client Launch on Encrypted Connections

I've been noticing that the Linux Citrix Client is slow to launch over encrypted connections, THis seems to be an issue if there is not enough data in the kernel. To resolve this performance issue, issue the command:


sudo ln -sf /dev/urandom /dev/random

THe client will now launch much faster

Sunday, February 28, 2010

Windows 7 Default User Profiles

Microsoft, in their infinite wisdom, has decided that default user profiles can only be altered as part of a sysprep process. In the past (Vista and earlier) from within computer properties you could simply copy a profile configured as desired to become the default profile. With Windows 7 this can only be done through the use of Sysprep. In order to perform this successfully the following needs to be performed.
  1. Create a user profile and configure the profile as desired
  2. Grant this user account admin permissions so that sysprep can be performed.
  3. Clear the contents of the c:\windows\panther and c:\windows\system32\sysprep\panther folder
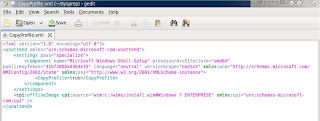
  4. Copy a sysprep.xml file with the copy profile option set to c:\windows\system32\sysprep. A sample of which is shown in the image below
  5. While logged on as the user with the profile to be copied, execute
    sysprep /generalize /unattend:c:\windows\system32\sysprep\sysprep.xml
Sysprep will then run and copy the current user profile as the default user profile.


Thursday, February 25, 2010

Setting up a tftp server under Ubuntu 9.1

Perform the following steps to setup a tftpd server under ubuntu 9.1
  1. Run: sudo apt-get install atftpd
  2. Sudo edit /etc/default/atftpd to read
    USE_INETD=false
    OPTIONS="--daemon --port 69 --tftpd-timeout 300 --retry-timeout 5 --mcast-port 1758 --mcast-addr 239.239.239.0-255 --mcast-ttl 1 --maxthread 100 --verbose=5 /tftpboot
  3. Create the /tftpboot folder by executing sudo mkdir /tftpboot
  4. Change so that all users can edit/modify files in this folder by executing: sudo chmod -R +777 /tftpboot
  5. Change the ownership to nobody by executing: sudo chown -R nobody /tftpboot
  6. Secure who can access this tftp server by editing the hosts.allow file in /etc and adding:
    in.tftpd :
That it....

Tuesday, February 9, 2010

Installing Amazon MP3 Downloader under 64bit Linux

Great! I want to buy and download MP3's from Amazon. Poop! I'm running Ubuntu 9.10 64bit, but there's only a 32bit debian package available. Well here's how you fix that...

  1. Download the 9.04 32 bit debian installer from Amazon. Currently located here.
  2. Once downloaded, force the installation of the product using the command: sudo dpkg -i --force-architecture amazonmp3.deb
  3. Now go grab a program called getlibs. This is a script that will download missing libraries for an installed package. Currently you can get this tool here.
  4. Finally run sudo getlibs /usr/bin/amazonmp3 from a terminal session
You're good to go....

Sunday, February 7, 2010

Make a bootable clonezilla USB drive

Clonezilla is a free opensource disk imaging tool. In order to make a bootable USB drive for this product, follow these steps:

  1. Download the product from here: http://sourceforge.net/projects/clonezilla/files/clonezilla_live_stable/clonezilla-live-1.2.3-27.iso/download
  2. extract the contents of the ISO to a USB drive.
  3. From the utils/linux directory run bash ./makeboot.sh under an administrator account
  4. Change directory to the root of the usb drive (most likely mounted under /mount/(USB name)
  5. execute cp isolinux/isolinux.cfg syslinux.cfg
  6. execute cp isolinux/vesamenu.c32 isolinux/ocswp.png .
You should now have a bootable clonezilla USB drive